Part I: Building Your Own Local Area Network
Here's a fun technology project that requires only basic technical skills, some grunt work, and some inexpensive equipment. Design and build a high-end wired ethernet network for your home. Sure, wireless is great for its convenience but, in every other way, a wired network is superior. It is faster, more stable, and more secure than a wireless network can ever be. And, if you want, it's easy to extend your wired network with wireless too. That's Part II of this tutorial. Part III will be for the home entertainment system. You will be working only with low voltage wiring, so risk of shock is low, but you should be comfortable with power tools and sharp objects, tight spaces, cobwebs, dirt, dust, and splinters.
Part I:
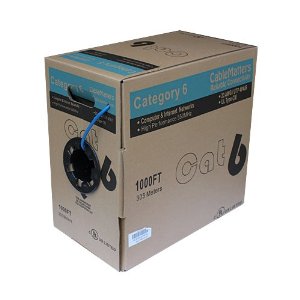
Go with CAT6: it's worth the extra money!
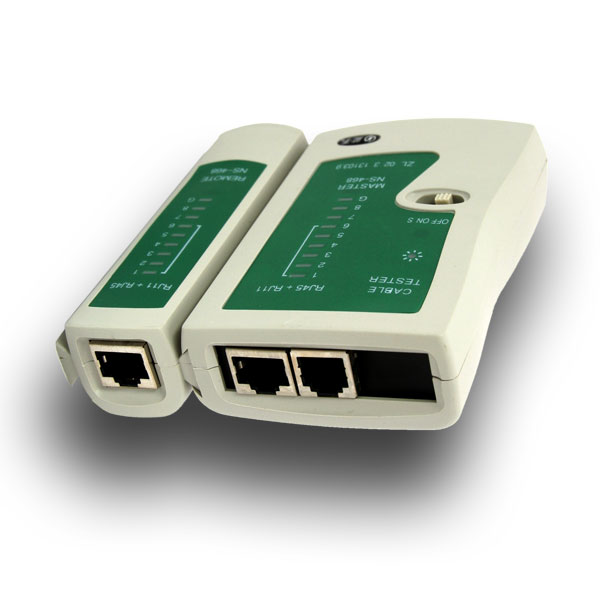
Planning: The ideal time to do any kind of wiring is during your home's construction or renovation phase, when the framing is in but before the drywall goes up. If you have an unfinished basement or crawlspace below or an accessible attic above, you're also in luck, but you'll be doing a lot more scrambling around in uncomfortable spaces. It can be very helpful to have a partner on the main floor; they don't have to get dirty but can feed or pull cables through the holes you drill. A pair of walkie talkies or a pair of cell phones is handy because you can't always hear each other easily. The toughest situation is when your house is on a slab, and there's another floor above the one you want to network. In that case, there's no easy or visually appealing way to run new wiring without wrecking the walls, installing the wiring, and then repairing the damage afterwards. Having a floorplan of the space is useful so that you can figure out approximately how much cable you'll need. You can purchase a 500 ft. or 1000 ft. box of ethernet cable at your local hardware store, along with most of the other supplies you'll need. You should purchase either CAT5e or CAT6 cable (CAT6 is better and costs only a little more money, and since pulling the wire is the worst part, I recommend future proofing.) In terms of performance, CAT6 supports data transfer speeds of up to 1000 Megabits per second, whereas CAT5e supports speeds up to 100 Megabits per second. These are called, respectively, fast ethernet and gigabit ethernet.) Ethernet cable is rated to function properly in runs of up to 100 meters (about 300 feet). Beyond that, you will need to boost the signal with another switch. Data transfer rates require an understanding of the units involved. Take a look at this page, which includes a unit converter, for more information.
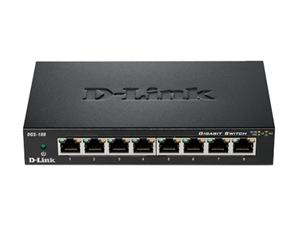
Be sure to buy a switch with "room to grow."
The Network Closet: If you have the option, position your network closet in the center of the house so that the shortest possible runs of cable can radiate out in all directions. You will need an electrical outlet in the closet so get an electrician to add that before you do anything else. Think about the locations where an ethernet jack would be handy. Plan for a jack for every device that can accept one. For example, run a line to your office for your computer, another for your printer, one for your network attached storage (NAS) device, one for your wireless access point (WAP), etc. Your media center is another location where you may want several lines run. One can be for your television (many modern TVs have an ethernet jack and can connect to services like Netflix and Pandora). One can be for your XBOX, Wii or PlayStation game system. One can be for your Roku or AppleTV box, or your media center computer. Count up all the ethernet jacks you're going to need and then buy a Gigabit Ethernet Switch from someplace like NewEgg, Staples, or Amazon. Make sure your switch has several more ports than the total number of jacks you think you'll need, because you need at least one more for the Internet Service Provider (ISP) router, and for any new device(s) you decide to add later. Speaking of the Internet Router, you will need either your land line telephone or cable tv coaxial cable (why not both?) run to the network closet too because this is the source of your Internet access. Routing phone or coax cable is also a do it yourself project if you're feeling up to it. I'll do a sidebar on that topic. Phone and cable are even simpler than ethernet.
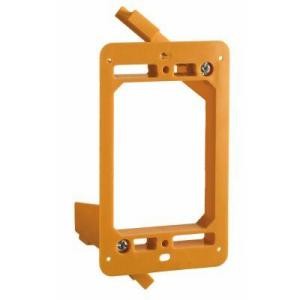
A low voltage gang box fits into the drywall.
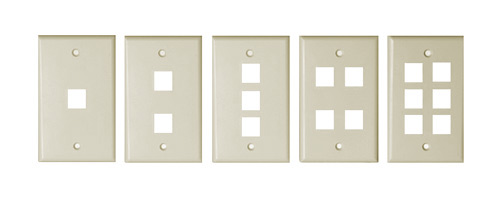
You can have between 1 and 6 ports per gang box cover plate.
Installing wall boxes: Purchase some low voltage gang boxes, one for each remote location and one or more for the "patch panel" in the network closet. You can buy cover plates with between 1 and 6 ports per gang box. Measure the size of the opening for the gang box and make a cardboard stencil in the same dimensions. Lay the stencil against the wall, away from the studs (use a stud finder or tap on the drywall listening for the hollow sound). Cut holes in the drywall for your gang boxes using a box cutter, reciprocating saw, or drywall hand saw. Slip the gang box into place (it should be snug) and swing out the arms that hold it in place. Tighten the screws to pull the arms in towards the interior side of the drywall.
Pulling cable: This is the part where I'm going to gloss over the pain and suffering and assume you have pulled the cable, somehow, from the network closet to the gang box at each remote location, and left a few feet of excess cable at each end. Because this is low voltage cable, it does not need to be enclosed in conduit. If the interior of the wall is exposed, just drill a hole through the center of each vertical stud and pass the cable horizontally along the wall through each one. Keep the ethernet at least a foot away from the electrical power for two reasons; you don't want to be near the high voltage lines for safety reasons, and putting the data line too close to the power line can cause data interference. Where you need to cross the ethernet over an electrical cable, try to do so at right angles. To cross from one room to another, drill up into the ceiling header to pull cable through the attic, or down through the floor footer to pull cable beneath the floor in an unfinished basement or crawlspace. A stud finder is a useful accessory. Be sure to wear your safety goggles when drilling, especially above your head, because all kinds of junk tends to fall into your face. An electrician's "fish tape" is sometimes very handy when running cable inside the drywall where you can't get at it, such as between the attic and the gang box hole you cut in the drywall down at ankle height. I should also mention that, at this point, the ethernet cable is not yet terminated with ethernet jacks; they would just get damaged when pulling the cable. Another important point is that at no time should you have to put excess strain on the cable. If you do, you may stretch or break it and it won't be good for anything! Sometimes, in tight spaces, you might find it necessary to fish a piece of strong twine (much narrower and more flexible than ethernet cable) through the channel first, and then use the twine to pull the ethernet cable through.
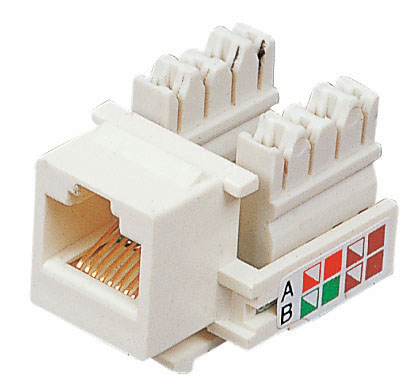
An RJ-45 keystone jack.
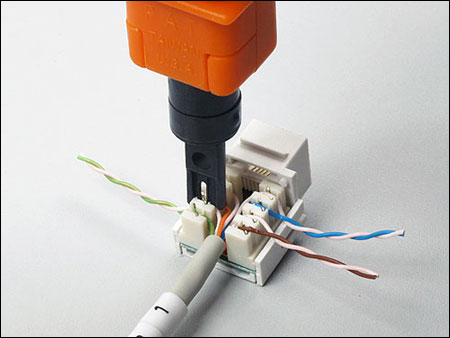
The punchdown tool pushes each wire into its channel and clips the excess wire.
Terminating cable ends: With each unterminated ethernet cable hanging out of the gang box, use a wire stripper to carefully remove about an inch of the outer covering of the ethernet cable. Be careful not to nick the wires inside. If you do, chop the damaged part of the cable off and start over. Inside the outer shielding, you will find 4 twisted pairs of color coded wires; usually orange, blue, green, and brown. One of the wires in the pair is a solid color while the other is white with a stripe of the same color. Separate the 4 pairs of wires. Follow the color coding on your RJ-45 keystone jack. Untwist the pairs and pull each wire down the center and into its side channel as shown in the picture. Keep everything as tight as you can and don't untwist more than necessary. Use a punchdown tool, with the blade side facing out, to push each wire into its channel, and then pop the cover in place to secure the wires. The excess wire should be cut off by the punchdown tool, or you can twist it gently and it should fall off. When each cable is terminated with a keystone jack, snap the jack(s) into the inside of the cover plate. Usually one side pivots and the other side has a clip that clicks into the cover plate; it can take a bit of force to click these in, and it's hard to get them out so do it right the first time! Look for up/down markings on the cover plate for guidance. Typically, the metal contacts inside the jack should be facing up so they stay free of dust and dirt, and the tab side of the jack is facing down. Once all of the keystone jacks are secured to the cover plate, gently push any excess ethernet cable back into the wall and mount the cover plate to the gang box using the pair of screws provided. Repeat this process back at the network closet.
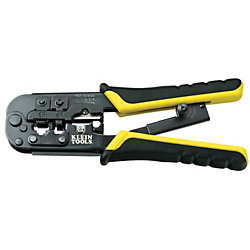
Crimper and wire stripper tool.
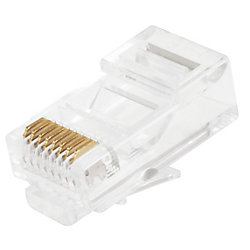
An RJ-45 modular plug.
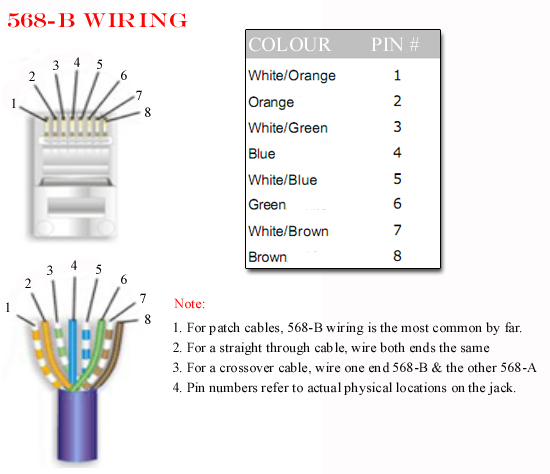
The ATT 568-B wiring pattern.
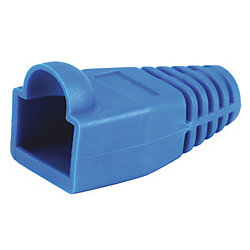
Strain relief boot.
Patch cables: Next, back at the network closet, you'll want to make a bunch of short ethernet "patch cables" for connecting your patch panel to the network switch. Optionally, if you want to make the cables look more finished when you're done, slide a strain relief boot down the unterminated ethernet cable before you strip off the cover. Next, strip the outer shielding off as before, about an inch from the end, and expose the 4 twisted pairs of wires. This time however, untwist all 8 wires and align them side by side from left to right in the following order, which is called the AT&T 568-B pattern:
| Pin | Wire Color |
| 1 | Orange & White |
| 2 | Orange |
| 3 | Green & White |
| 4 | Blue |
| 5 | Blue & White |
| 6 | Green |
| 7 | Brown & White |
| 8 | Brown |