You can set up a dual boot Mac/Windows system on a current iMac, Mac Mini or any modern Intel Mac. It is even possible to do a triple boot Mac/Windows/Linux system, but that's a bit more involved. Why would one choose to do this? When training faculty, it's easier for them if they are working on a system they are familiar with. With dual-boot systems, we just ask them if they prefer Mac or Windows and then boot up the machine accordingly.
The benefit of dual boot instead of virtualization (programs like Parallels or VMWare Fusion) is that all of the resources of the computer are dedicated to either the Mac side or the Windows side (you pick your OS at startup) so you can run multiple OSes on a less powerful machine with less RAM. The benefit of virtualization is that you can run both Windows and MacOS at the same time, but it requires a powerful machine with a lot of RAM to run well.
You will need a full (not upgrade) copy of Windows, and the license key(s) to run it on as many machines as you will need. If possible, use multi-licence media. A 32-bit Windows 7 will work with older Intel machines, but the 64-bit Windows 7 works with all current Apple machines. Boot Camp version 3 or later is required for 64-bit Windows.
Apple's Boot Camp Utility (comes included with the 10.5 Leopard OS and newer): an easy way to create the partitions and prep the Mac system for dual boot. It's important to understand the difference between a partition and a format of the drive. A partition divides the physical space of the drive into two or more separate regions. When you partition the drive, you designate how much of the drive will be used for a particular file system. The format or file system (MacOS Extended, MS-DOS (FAT), or NTFS are a few examples) is the language spoken in that region. When you "format a drive" you wipe the file system and files on that drive will no longer be accessible without special tools. With Boot Camp, Windows partitions will start out formatted as FAT but, during the Windows installation, it will be converted to an NTFS format.
- Snow Leopard (10.6) Manual for Boot Camp: http://manuals.info.apple.com/en_US/Boot_Camp_Install-Setup_10.6.pdf
- Lion (10.7) Manual for Boot Camp: http://manuals.info.apple.com/en_US/boot_camp_install-setup_10.7.pdf
- In the case of machines that lack an optical drive (new Mac Mini, MacBook Air) you will need to install Windows from a bootable flash drive. I initially had some trouble with this. Apparently not all USB Flash drives are created equal. I also had no luck using an external Apple USB Optical Drive...the driveless Mac would not boot the Windows media but there was nothing wrong with the media, since I had used it successfully with other Macs.
Apple's main knowledge base page on Boot Camp:
http://www.apple.com/support/bootcamp/Apple's Disk Utility: one of several methods used to create the Mac disk image for deployment to a lab full of similar machines. Disk Utility can also be used to size the original partitions to prepare the drive. However, Windows will apply the final format to the Windows partition during the installation process.rEFIt, a free boot selector utility installed on the Mac side. It's optional but it makes attractive startup icons that the user can pick to select Mac or Windows. rEFIt takes the place of the Apple bootloader (activated by holding down the Option key). However, if a user holds down Option on reboot, the rEFIt utility will be disabled and needs to be "re-blessed" in order to work again. See the documentation for details. rEFIt also has some nifty options that allow you to specifty the default OS and/or boot up after a specified countdown if the OS is not selected by the user.
http://refit.sourceforge.net/WinClone, a modestly priced and super-easy-to-use Mac program which allows you to copy the Boot Camp Windows "image" and then deploy it to the Windows partitions in a lab full of identical machines. After deployment, you only need to change a few settings such as machine name. Winclone has recently been re-written and updated. It's a useful product. A more powerful but much more complicated alternative to WinClone is Deploy Studio or Casper, a Mac ghosting tool.
Both of the following are great free tools for copying the contents of one Mac hard drive to another one, and they make it bootable! Great for backup too!
- Super Duper: http://www.shirt-pocket.com/SuperDuper/SuperDuperDescription.html
- Carbon Copy Cloner: http://www.bombich.com/
X-Mouse Button Control: This little utility allows you to disable the mighty mouse's side buttons, which can be annoying in Windows because they are easy to squeeze accidentally and, in a browser, they activate the back button. On the Mac side, you have more customization options for the mouse. Maybe Apple will provide better Windows mouse driver software in a future Boot Camp release, but in the meantime, this little utility saves the day!
http://www.highrez.co.uk/downloads/XMouseButtonControl.htmMagic Tools for Windows: If you use wireless Apple mice or trackpads on Windows, this inexpensive utility supplies the drivers to make them work well in Windows.
For a triple boot machine, here are some nice instructions that worked great for me! Follow them carefully. Especially the part involving the formatting of partitions.
http://www.lifehacker.com.au/2010/05/how-to-triple-boot-your-mac-with-windows-and-linux-no-boot-camp-required/
Here's an illustrated installation guide from 2009. Not too much has changed since then.
http://www.tuaw.com/2009/11/02/an-illustrated-guide-to-boot-camp-and-windows-7/
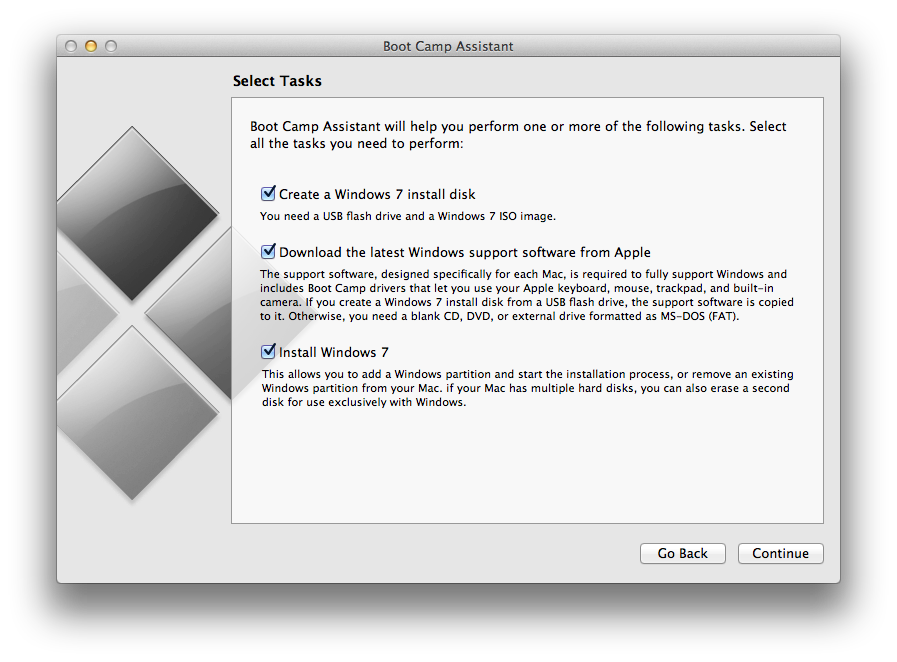
- In the Utilities folder inside the Applications folder on your Mac, launch the Boot Camp Assistant application.
- Select each of the tasks you wish to perform.
- If necessary (because machine has no optical drive) create a bootable Windows installer on a USB Flash drive.
- For me at least, in Lion on a machine without an internal optical drive, even an Apple brand external drive would not boot the Windows Install DVD.
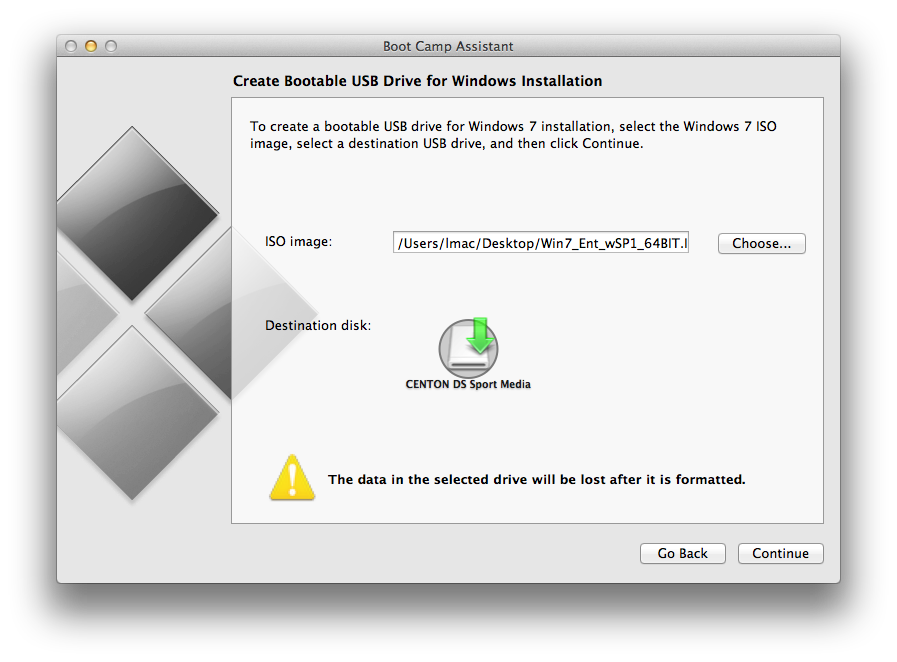
- You will need the Windows media in .ISO format (You can use Apple's Disk Utility to make an ISO) in order to create the Flash drive installer.
- Create Bootable USB Drive
- Apparently some Flash media work and others don't. If the flash drive won't boot Windows, try different media.
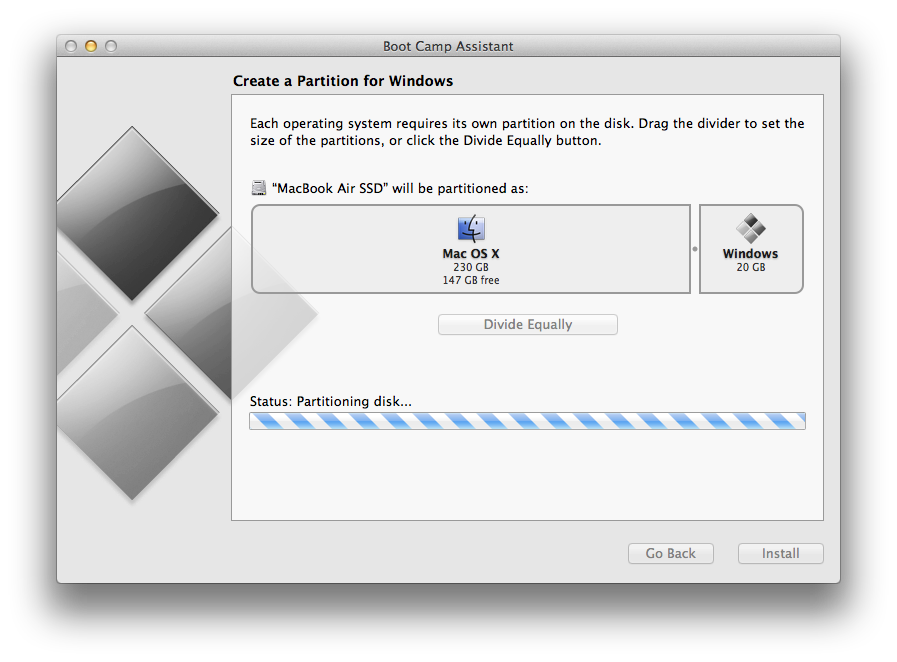
- Create a Partition for Windows.
- Decide how big you want the Mac and Windows partitions to be.
- Partitioning does no harm to the contents of the Mac's drive; the Windows partition is created from free space.
- If the Mac's hard drive is too full and/or significantly fragmented, Boot Camp Assistant may not be able to create a second partition. In this case you can try defragmenting the drive. If that doesn't work, you will need to back up the drive and reformat.
- If you delete the Windows partition later, the Windows portion of the drive again becomes available to the Mac.
- At the end of this process, the machine may reboot on its own.
- Reboot from the Windows Installer media.
- If necessary, hold down "Option" key at startup to select the boot device.
- If you get a No Bootable Device error, try a different Flash drive.
- Format the Boot Camp partition (the format specifies the file system that will be used on a partition)
- The Boot Camp partition is initially in FAT32 format and needs to be re-formatted by Windows as an NTFS partition. FAT volumes are limited to 32 Gigabytes, which is too small for most practical uses.
- While the MacOS can read and write to FAT formatted volumes, it can only read NTFS. There are some complex workarounds like MacFUSE, but I recommend simply formatting an external USB Flash Drive or other volume in FAT format and using that as a file transfer space.
- Install Windows
- This will involve several reboots.
- If Windows doesn't come up automatically, hold down the "Option" key after the restart chime if necessary, and select the Windows partition on the hard drive.
- Install Apple's supplied Boot Camp Drivers
- These will be in a folder called Windows Support on your flash drive if you checked the middle box in Boot Camp Assistant.
- Boot Camp Drivers can also be found on the original discs* that came with your Mac, or on a generic OS X install disk.
- Note: If your Mac is newer than the generic OS X install disk, the disk may not contain the right drivers.
- *Beginning with OS X 10.7 (Lion), there are no disks included with new Macs.
- This installs Windows drivers provided by Apple for some of the Apple specific hardware such as the wireless card, graphics card, and webcam.
- Install Windows anti-virus software
- This is a Windows machine now, and is vulnerable to all of the Windows viruses out there.
- Run all Windows Updates
- Windows updates patch security holes and are important to protect your machine from hackers.
- This will involve several reboots.
- Run Apple Software Update
- Install any Boot Camp updates and other software as desired.
- Activate Windows
- Here at NAU, this requires first registering the machine on the NAU domain and then joining it to the domain.
Time bug: On the Mac side, when the machine was previously booted into Windows, the time may be incorrect. This usually corrects itself without any intervention.
Energy saver: Settings for automatic (timed) start up and shut down may not work after the machine reboots from Windows to the Mac side. A second restart on the Mac side usually fixes this. This may be related to the time bug mentioned above.
Apple Remote Desktop: A shutdown command from ARD may instead restart the machine when it reboots from the Windows side to the Mac side. A second restart on the Mac side usually fixes this.
One catch: to image a lab full of machines based on the installation performed on a single machine, you will have best results if the machines are identical or very similar. This is especially true on the Windows side. If the differences between source and destination machines are not too extreme but you encounter errors, you may be able to use the Windows media to do a "repair" that will fix any driver issues that arose due to cloning.
- On the source machine, run WinClone from the Mac side.
- Create an image of the Boot Camp (Windows) partition.
- Save that file somewhere on the Mac side of the computer. The file will be large. You can save it to an external drive if necessary.
- On the destination machines, use Boot Camp Utility to create the Windows partitions.
- Connect the source machine to a destination machine via firewire cable
- Start up the destination machine in target disk mode.
- Use Carbon Copy Cloner or Super Duper to clone the Mac partition from the source machine to the destination machine.
- Use Winclone to clone the Windows image to the destination machine's Windows partition.
- Edit the machine name information on both the Windows and Mac sides.
- Repeat for each machine in the lab.