Collaborate Ultra
Collaborate Ultra is the new version of Blackboard's live (synchronous online) conferencing tool. You can use Collaborate Ultra for remote office hours or live meetings in your online class. Follow these steps to set up a session. This tool is highly integrated with Blackboard.
- Log into Bb Learn and enter your class.
- In the upper right, make sure Edit Mode is ON
- There are two ways to create access to Collaborate Ultra. Do either one of these:
- Add a Link to the Course Menu
- In the Course Menu on the left, click the + button to add a Tool Link.
- From the pull-down list, select Blackboard Collaborate Ultra or the entire Tools Area.
- Check the box to make the link Available to Users.
- Create an Icon Link in the Course Content Area
- In the Course Content area, go to the Tools menu, select More Tools, and then select Blackboard Collaborate Ultra.
- If Blackboard Collaborate Ultra is not listed under More Tools, go to the Course Menu on the left side of the screen, select Customization/Tool Availability, and check the box next to Blackboard Collaborate Ultra.
- Enter a description (optional), set the availability options, and hit the Submit button. There will now be an icon with a link that students can click to access your Collaborate session.
 Collaborate Ultra
- Click on the Collaborate Ultra link. If you get an error that says you need to install Flash, you can download it here. (Enabling Flash allows the app to control your computer's camera and microphone.)

- Students can enter the Course Room anytime. This is a general use session that is pre-built. You can also create sessions that open and close at specified times using the Create Session button. The scheduled sessions have additional options such as attendance tracking.
- When you click on the Course Room, a pane opens on the right with lots of settings.
- Click the black -->Join Course Room button to enter the room.
- Note the Guest link option that you can share with non-course members such as invited speakers.
- Watch this video for an overview of the Collaborate Ultra interface.
- Controls are in three places:

- Session Menu in the upper left corner of the screen.
- Start Recording
- Help
- Leave Session (at the bottom left)
- Collaborate Panel in the bottom right corner of the screen.

- Chat
- Attendees
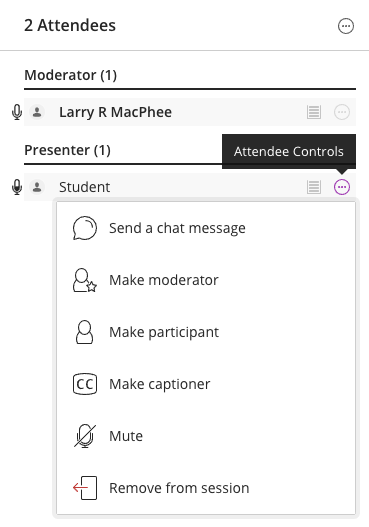
- You can change the privileges of an attendee to make them a presenter or a moderator. Click the three dots next to the attendee name to access the Attendee Controls

- Share Content
- Primary Content
- Share Whiteboard
- Share Application/Screen
- The Chrome browser lets you share full screen, a browser tab, or an application.
- Share Files
- Secondary Content
- Interact
- Breakout Groups: You can drag students into breakout groups to subdivide the class. Add more groups with the + button.

- My Settings
- Audio and Video settings
- Notification Settings
- Session Settings

Chat, Attendees, Share Content and My Settings icons
- More Controls at bottom center of screen

- My Status and Feedback
- Audio (Off/On)
- Video (Off/On)
- Raise Hand
What's different in the new version?
- The new version of Collaborate Ultra is no longer Java based, so clients no longer need to download and install an applet.
- Without its reliance on Java, there are fewer security related issues to overcome.
- The interface is streamlined to make it easier for beginners.
- Mobile device users (iOS and Android) can access Collaborate Ultra via the Blackboard app.
Best Practices
Technical best practices
- if video is choppy, ask participants to turn off their video
- mute participants to reduce background noise
- if you're having problems with feedback or echo, use a headset mic or mute yourself when not speaking
- run a pre-class session to test the camera and mic settings in advance (see below)
- if camera or mic are not working properly, quit any other apps that might be using them and then quit and re-open Collaborate
- restart the computer as a last resort
- recommend the phone in option for very low-bandwidth users
Organizational best practices
- all remote (easiest)
- a few clusters of participants in rooms together (intermediate)
- in-person classroom plus a variety of remote participants (most difficult)
Pedagogical best practices
- presenter role (leads the presentation)
- moderator role (monitors the chat, looks for raised hands, intervenes when appropriate)
- tech support role (makes sure the tech is working)
- always assume you've got a hot mic and public text area; don't say anything you wouldn't want repeated!
- it's nice if the presenter uses a camera, but not everyone needs one, and many prefer not to use it
- audio only is fine for students, and better on low-bandwidth connections
Live Demo
Try it now! Click this link to join an open Collaborate room. You will need to manually turn on your mic and camera, as they will start out muted. Have a friend join from another location using the same link. You will have moderator privileges.
Test the following:
- audio/video test
- share screen
- polling
- sharing moderator privileges


 Collaborate Ultra


