![]()
![]()
Have you ever noticed a Blackboard page where a really wide graphic forces the user to scroll left and right to view the content of the page? There's an easy fix. The simplest way to make graphics look better in Blackboard is to change them from fixed width and height to scaled. You do this by first embedding the graphic on the page in the usual way, using the + button in the toolbar to Insert a file from your computer or the course's Content Collection. Then click on the <> button to view the HTML Source Code. If you see fixed width and height values (in pixels) for the graphic, such as width="488" height="326" change the width to a percentage, such as width="80%" and delete the height information. If you don't see any fixed width information but there is a style reference, leave what's already there inside the quotation marks, but add the following: width: XX%; where XX is the percentage of the page width you want the graphic to fill. Click Save to make the change and close the HTML source code editor window. Now the graphic will automatically resize depending on the size of the window, always taking up the percentage of the screen that you specified. Not only does this look better, but it's more mobile friendly if someone is viewing your page on a very small screen.
Another easy change lets you hang the graphic off the left or right side of the page. For example, put a float: left; or float:right; inside the style= quotes.
Then, after the HTML code for the image source and properties, add some text in a paragraph like this: <p>text text text</p> This text will wrap around the graphic.
If you prefer to center the graphic, use the <center> and </center> open and close tags, with the image in between. Often, a <br/> break tag before and after creates a nice white space between the paragraph of text above and below.
If you go back to edit the HTML later and discover a bunch of <span> and <font> tags, get out of HTML mode, select the text in the editor, and click the Tx (Clear Formatting) button and save your changes. When you go back into the <> HTML mode, the formatting will be gone.
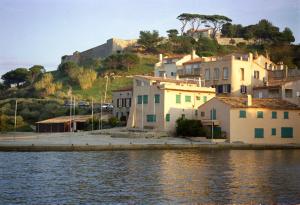
The source code below will create a nice framed, text-wrapped, scaling figure in Bb Learn, with an italicized caption centered below. In technical jargon, you need to embed the CSS in-line, because Bb Learn strips out the header from the HTML. Throughout this tutorial, we are pointing at the same graphic. There is only one copy, and it's somewhere out on the web.
Just go to Build Content and create a Blank Page or Item, go into the HTML Source Code view by clicking the <> button in the bottom row of the toolbar:

Copy/paste the following HTML code into the HTML Editor:
<p>text above the graphic</p> <div id="figure" style="float: right; margin: 5px; padding: 5px; border-width: thin; border-color: silver; border-style: solid; width: 33%;"><img src="http://www.w3.org/Style/Examples/007/st-tropez.jpg" style="float: right; width: 100%;" alt="Saint Tropez and its fort in the evening sun" /><p style="text-align: center; font-style: italic; font-size: smaller; text-indent: 0px;"><a href="http://en.wikipedia.org/wiki/Saint-Tropez" target="_blank" title="Saint Tropez">Saint Tropez</a></p> </div><p>wrapped text beside and below the graphic</p>
Next, replace the image link and title info with those for your own graphics. You can also change the float from right to left, or change the width from 33% to anything you like.
How it works line by line:
Reference: http://www.w3.org/Style/Examples/007/figures.en.html
Code for a left side version at 10% size:
 <div id="figure" style="float:left; margin: 0.5em; padding: 0.5em; border-width: thin; border-color: silver; border-style: solid; width: 10%;"><img src="http://www.w3.org/Style/Examples/007/st-tropez.jpg" style="float: right; width: 100%;" alt="Saint Tropez and its fort in the evening sun" /> <p style="text-align: center; font-style: italic; font-size: smaller; text-indent: 0px;"><a href="http://en.wikipedia.org/wiki/Saint-Tropez" target="_blank" title="Saint Tropez">Saint Tropez</a></p>

<p style="text-align: center; font-style: italic; font-size: smaller; text-indent: 0px;">This version floated left, scaled to 10%</p>

</div>
<center><div id="figure" style="margin: 0.5em; padding: 0.5em; border-width: thin; border-color: silver; border-style: solid; width: 15%;"><img src="http://www.w3.org/Style/Examples/007/st-tropez.jpg" style="float: right; width: 100%;" alt="Saint Tropez and its fort in the evening sun" />   <p style="text-align: center; font-style: italic; font-size: smaller; text-indent: 0px;"><a href="http://en.wikipedia.org/wiki/Saint-Tropez" target="_blank" title="Saint Tropez">Saint Tropez</a></p><p style="text-align: center; font-style: italic; font-size: smaller; text-indent: 0px;">This version centered, scaled to 15%</p>

</div></center>
Code for a pair of images side by side in a single box. Each of the graphics is set to slightly less than 50% (you have to factor in the margin and pad) so they can sit side-by-side.
 <center> <div id="figure2" style="border-width: thin; border-color: silver; border-style: solid; width: 75%;"> <img src="http://www.w3.org/Style/Examples/007/st-tropez.jpg" style="width: 48%; padding: 0.25em; " alt="Image 1" /><img src="http://www.w3.org/Style/Examples/007/st-tropez.jpg" style="width: 48%;  padding: 0.25em;" alt="Image 2" /> <p style="text-align: center; font-style: italic; font-size: smaller; text-indent: 0px;">Compare <a href="http://en.wikipedia.org/wiki/Saint-Tropez" target="_blank" title="Saint Tropez">Image 1</a> and <a href="http://en.wikipedia.org/wiki/Saint-Tropez" target="_blank" title="Saint Tropez">Image 2</a> and discuss their differences.</p>

</div> </center>Code for a pair of stacked images in a single box:
<div id="figure" style="float:right; margin: 0.5em; padding: 0.5em; border-width: thin; border-color: silver; border-style: solid; width: 12%;"><img src="http://www.w3.org/Style/Examples/007/st-tropez.jpg" style="float: right; width: 100%;" alt="Saint Tropez and its fort in the evening sun" /> <p style="text-align: center; font-style: italic; font-size: smaller; text-indent: 0px;"><a href="http://en.wikipedia.org/wiki/Saint-Tropez" target="_blank" title="Saint Tropez">Saint Tropez</a></p><p style="text-align: center; font-style: italic; font-size: smaller; text-indent: 0px;">Image 1</p><img src="http://www.w3.org/Style/Examples/007/st-tropez.jpg" style="float: right; width: 100%;" alt="Saint Tropez and its fort in the evening sun" /> <p style="text-align: center; font-style: italic; font-size: smaller; text-indent: 0px;"><a href="http://en.wikipedia.org/wiki/Saint-Tropez" target="_blank" title="Saint Tropez">Saint Tropez</a></p><p style="text-align: center; font-style: italic; font-size: smaller; text-indent: 0px;">Image 2</p></div>
Flagstaff, Arizona
928-523-9011
| Flagstaff Campus | News & Media | NAU Community | Policies |
|---|---|---|---|
| Maps & Directions | NAU News | Current Students | Accessibility |
| Transportation | Media Relations | Future Students | Diversity |
| Parking | Parents | Equity and Access | |
| Calendar of Events | Safety | Alumni | Privacy |
| Jobs at NAU | NAU Alert | Living on Campus | Title IX |
| NAU Police | Bookstore | Student Consumer Info | |
| Emergency Management | Student Services | ||
| © 2021 Arizona Board of Regents | |||