
Monday.com overview
Monday.com is a flexible and easy-to-learn online database. To access our NAU Online Monday.com site, go to this link: https://nau757559.monday.com/
If you need access, contact Mathilde, Samantha, Larry, or Brynn, who have admin access to add users.
To get started, it's useful to understand some of the basic navigation buttons and the terminology the tool uses. Here's a nice overview video that is short and clear.
Left Side Navigation


The Monday.com logo in the upper left is like a home button. From any page in the tool, it will bring you back to the entry page.
Workspaces are areas where each sub-group within the unit will organize their content into one or more Boards. Think of your workspace as a top level folder. You will enter this area to do most of your work. Workspaces are listed in a toolbar as colored capital letters, stacked vertically just to the right of the main Navigation toolbar. To add a new workspace, click on the three dots at the bottom of the workspace toolbar ... If the workspace toolbar is not visible, click on the Workspaces icon in the left side navigation.
Notifications keep you informed about activity within the system. These can get annoying, but you can control which things you are notified about within your user profile.
The Inbox keeps track of messages between members.
Further down on the left is a calendar view called My Week
You may have the ability to invite additional members with the Invite button
Search lets you quickly find something on the site.
Help brings up useful information to assist you with the tool.
Your Profile has a lot of custom settings but you can set these later.
Boards
Import Data: Within your workspace, create your first Board. A board is like a spreadsheet but with a few more options you'll discover later. You can import data from Excel, Google Sheets, and other sources using the New Item/Import Items button, or from the + Add button in the workspace list. One way is to do an export from your current system to Excel and then do some test imports. If it doesn't work perfectly the first time, clear your Monday board, make adjustments on the other end, and try again. Columns come over best as text, number, date, e-mail address, or status (a short list of possible options), but you can add and change column types after the import.
If you want to break your board into major blocks that contain the same columns you can choose New Item/New Group of Items. A good use of this might be to separate Pending projects from In Progress and Completed ones, or maybe to break things up by year. Of course, you could also keep them all in one group and create a Status column with those options. Monday is very flexible. Set it up however it's most useful for reporting. In our example below, we kept everthing in one giant table and broke it out with different Views (the pull-down where it says Main Table).
More about imports: https://support.monday.com/hc/en-us/articles/360000219209#Import_data_into_existing_board
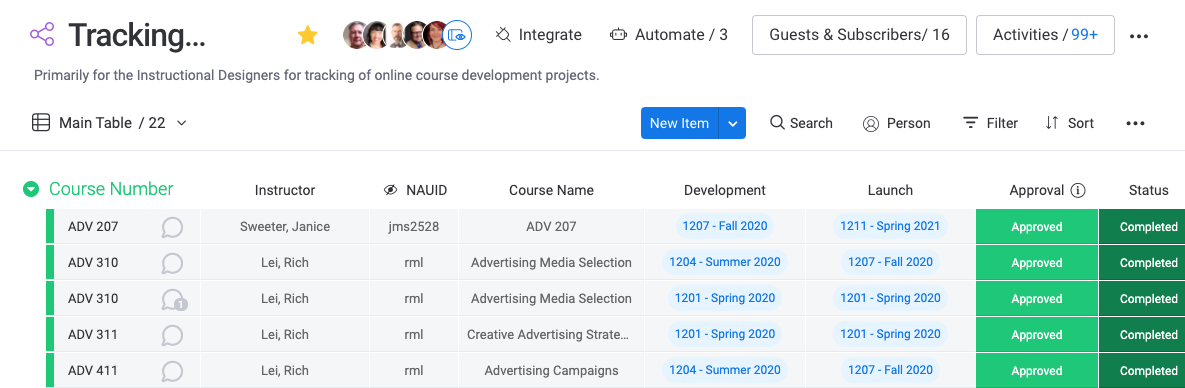
The Main Table within the Project Tracking Board
Add Columns
Add any additional columns you'll need by clicking the + button on the far right side of the board. There are many column types, so think about what kind of column makes the most sense for each kind of data. You can change things later however. Below is a list of the common column types. To get started, pick from the Essentials list. Most are self-explanatory. Status is a special pull-down menu with a limited set of options. You must pick only one from the list. For example,the status of a task might be "In Progress" or "Completed." Dropdown is similar, but you can pick more than one option from the menu. For example, you might assign 2 or more people to work on a project.
Column Templates: You can also add columns using a pre-built template, by clicking the More columns option, and scrolling to the bottom of the page that appears, and selecting from the options. Templates can save you work by giving you a pull-down menu that is pre-populated with all of the possible choices, such as College, for example. Columns can be easily re-ordered by dragging from the title bar, and columns can be collapsed (hidden from view) or made private (non-visible when shared publicly). A good use of this option is with sensitive data, such as a person's NAU ID.
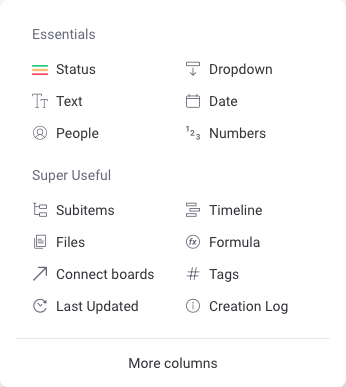
Column types
Access
Who can see your board? At the top of your board, there is a button called Guests & Subscribers. You can add people to the list of who can view and edit your board. You also have the option to publish your board and share it with guests. You can decide which columns those guests can see. You can create a share link or copy/paste the code to embed an iFrame in a web page. These views are read-only.
More about sharing: https://support.monday.com/hc/en-us/articles/360009695080-How-to-share-a-board-view-publicly
Sort, Filter, and View your Data
Once you have created a large table, you can filter results to show only items of interest. For example, you might filter the Project Launch column to show you only Fall 2022. Then you can use the sort to list (alphabetically) Courses by number. You can filter on multiple terms, such as Spring 2022 and Summer 2022, and you can also sort on multiple terms, such as first by College, and then by Course Number. When you clear the sort and/or filter, the full table is restored. If you sort and filter on the same things often, you can save this as a View that you can return to later. For example, you could make a view of projects assigned to a particular person, or projects in a particular college. From the Main Table title in the upper left, click on the V and select +Add View. You will see that among the options are a variety of different ways to view your data in addition to a sorted and filtered table. here are some examples:
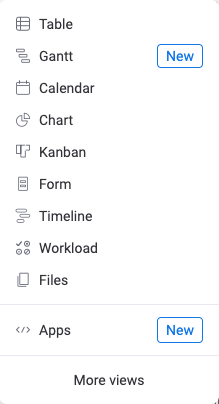
Add a view
Another handy feature is the ability to Pin columns so they stay visible while you scroll to the right. You select this from the three dots ... at the top right of the board.
Automations
At the top of the board, click on the Automations button to see what actions can be scripted. For example, let's say you want Laura to know when a project status is changed to Completed, by sending her an e-mail.
Advanced: Connections between Boards
At some point you are going to outgrow the single table that contains all of your data, either because it gets too big and cumbersome, or because of one-to-many relationships. If you are familiar with "relational databases," that's what the Connect Boards tool does. It creates a relationship between rows in one board with rows in another board using a key field to link them. Imagine a scenario where you have a board to keep track of Projects, and another board to keep track of Clients. You will connect the two boards by creating a "Connect Boards" column in the Projects board. When prompted, select the board you want to pull data from; namely, the Clients board. Then you select the columns from the Clients board that you want to "mirror" in the Projects board. You can add more Mirror Columns later if needed. For example, the mirrored columns might be lastname, firstname, e-mail address, phone number, street address, city, state, zip code, etc, or some subset of these. Let's say that Ann Clark has the unique id "abc12". In the Connect Boards Column, you will enter "abc12" in the row that involves her project. This will cause the Projects board to auto-fill the data from the Clients board into the mirrored columns, without you having to type them. If, when setting this up for the first time, you checked the box to make this a 2-way connection, then changes made in either board will be simultaneously reflected in the other board. Where this really starts to save you work is when you have multiple projects for the same client, and you only need to enter the client's id to pull up all of the client's contact info, which you entered previously. You can even set up multi-way connections. Imagine a board that lists courses, another board that lists students who have taken these courses, and a third board that lists various awards and the students who have earned them.
Support
On our Main Workspace (the pink M), take a look at the board called Training - Become a Monday Master! or, if you want more basic material, the Basic Training - Monday.com. Both of these boards have links to a wide range of videos that cover the common tasks and features of Monday.com
Recommended: There are Basic Walkthrough, Intermediate Walkthrough, and Advanced Walkthrough videos that cover this material well.
Contact Tech Support: https://support.monday.com/hc/en-us