Copy Files between My Computer and the Vista Server
In order to copy files between your computer and the Vista server you need to set up a WebDAV connection. A WebDAV connection (similar to File Transfer Protocol or FTP) links a folder on your machine with your course folder on the Vista server. WebDAV allows you to create, change and move documents between a remote server and your local machine. Consequently, you need to do the following four things to copy your files between your computer and the Vista Server.
1. Create a Vista course folder on your local machine.
2. Find out the path to your course folder on Vista.
3. Set up the WebDAV connection in Dreamweaver.
4. Create your HTML course content pages on your local machine.
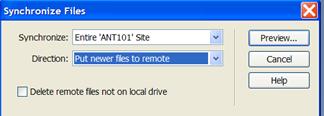
5. Copy or synchronize the files so a duplicate copy exists in both locations.
Create a Vista Course Folder on Your Local Machine
A local folder is your working directory on your personal computer where you will store a copy of your course files. HTML Editors often refer to this folder as your local website. The local folder is usually a folder on your hard disk.
To create a new folder on your hard disk:
1. Click Start > My Documents (You can also select another location on your hard drive where you would like to store your course files).
2. Select File > New > Folder
3. Change the folder name from New Folder to something that makes sense to you (i.e., EDL 599_Vista).
3.1. Using your mouse, right-click on the Folder name and select Rename.
3.2. Type in the new name.
3.3. Press Enter to accept the name change.
4. You can also create a new folder by right-clicking a blank area in a folder window or on the desktop, pointing to New, and then clicking folder.
Get Your WebDAV Folder Information in Vista
Note: only Dreamweaver 8 will work for transferring files via Vista's secure connection.
In Dreamweaver, any site outside of Dreamweaver is referred to as a remote folder. In this case, the remote folder is your Vista File Manager.
- Open your browser and go to the Vista Log In page (http://vista.nau.edu).
- Log in using your jan id and password.
- Enter the class you would like to setup the WebDAV connection for.
- Log on to the WebCT Vista website using your jan id and password.
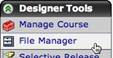
- In the Build tab, navigate to File Manager.
- Click on the small grey action menu to locate the WebDAV folder path.

- The WebDAV address is automatically highlighted so you can copy the information into Dreamweaver.
- Copy the WebDAV address (control+C = shortcut). This information will be pasted into Dreamweaver when you set up the connection.
Set Up the WebDAV Connection in Dreamweaver
- In the Toolbar, Select Site > Manage Sites.
- The Manage Sites dialog box appears.
- When the Manage Sites dialog box appears, select New. Select Site
- The Site Definition dialog box appears.
- Click the Advanced tab. You will set up the WebDAV connection between your local and remote folders here.

In the Local Info Category
- Give a descriptive name to your site so you can identify it quickly later. (ECI599_Fall2006)
- Select the Local root folder to point to a local folder on your computer.
- If you will be using images, define your Default images folder within your main folder.
- You do not have to define the info below the Default images folder.
In the Remote Info Category
- Under Category select Remote Info
- Access: Select WebDAV
- Paste the URL copied from Vista into the URL box (control+V to paste)
- Use Jan login and password.

At this point, you can select Test to connect to Vista.
o A File Activity dialog box will appear stating Connecting to Your Course.
o A popup message will state Macromedia connected to your Web server successfully.
Note: If you get an error message on the test, recheck your password entry. If you change your jan password, you will have reenter the new password.
Create Your HTML Course Content Pages On Your Local Machine
Creating a Basic HTML Page
1. File > New > Basic page > HTML

2. Type in a title that makes sense to you and a student.
![]()
3. Type your content as you would in Microsoft (MS) Word or copy your content from an open MS Word document.
4. The format or properties panel is located at the bottom of the page unlike MS Word where it is located at the top of the page. Consequently, you can format your document the same way you would in MS Word using Headings, Bold, Italic, Font, ordered lists, and unordered lists.

5. To view
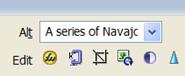
your document in a browser, save the file and then click on the globe ![]() icon.
icon.
6. If you want to see the HTML code, you can toggle between the Code, Split, and Design tabs located at the top of the open file.
![]()
Creating a Hyperlink in a Basic HTML Page
You can link to a particular section of a document, to a file in your local directory, or to an outside internet site.
Linking To A Named Anchor
You can create links to a set location in a document such as a heading or subheading. A named anchor is the place you want the link to go. For example, you may decide to have an internal navigation at the top of your syllabus pointing to named anchors such as Introduction, Course Objectives, Calendar, etc. You can then create links to these named anchors, which quickly take your visitor to the specified position. Creating a link to a named anchor is a two-step process. First, you create a named anchor, and then you create a link to the named anchor.
To Create A Named Anchor
1. In the Document window's Design view, place the insertion point where you want the named anchor.
2. Do one of the following:
o Select Insert > Named Anchor
The Named Anchor dialog box appears.
![]()

2. In the Anchor Name text box, type a name for the anchor, and click OK.
The anchor marker appears at the insertion point.
To Link To A Named Anchor
1. Select the text or an image where you want to create a link from.
2. In the Link text box of the Property inspector, type a number sign (#) and the name of the anchor.
For example:
![]()
o To link to an anchor named "top" in the current document, type #top.
o To link to an anchor named "top" in a different document in the same folder, type filename.html#top.
To Link to a File Using the Point-To-File Method
1. Select text or an image you want to link from.
2. Click the Point-to-File icon to the right of the Link text box in the Property inspector and drag it to the file you want to link to.
To Link to an Outside Internet Site Using the Property Inspector
You can use the Property inspector's folder icon or Link text box to create links from an image, an object, or text to another document or file.
1. Select text or an image in the Document window's Design view.
2. Type in the URL address into the Link textbox.
*Note: Be sure to select _blank in the Target pop-up menu. This option will open the web page in a new browser window. Students will not leave your course pages and have an easier time printing anything in the new window.

Inserting a Table into Your HTML Document
Use the Insert bar or the Insert menu to create a new table. Then, add text and images to table cells the same way that you add text and images outside of a table
1. Place the insertion point where you want the table to appear.
*Note: If your document is blank, then the only place you can place the insertion point is at the beginning of the document.
2. Select Insert > Table.
In the Common category of the Insert bar, click the Table button.
3. The Insert Table dialog box appears.
![]()