Creating Content in Blackboard Learn
Getting there: bblearn.nau.edu
There are many ways to create content in Blackboard. Here is a printer-friendly quick reference sheet for some content creation best practices in Blackboard Learn. We recommend using Blackboard's built-in HTML editor for most content creation tasks. It's easy to use, and creates the most ADA compliant, mobile friendly, and accessible content for students. Once a document is in Blackboard as an HTML page, it's also much easier to edit in future.
I. Edit Mode 
- To modify the content of the course, the Edit Mode control must be in the ON position.
- Turning Edit Mode OFF hides the instructor tools and allows you to see the course as students do.
- Note: One exception is the Course Management Control Panel (the gray area below the Course Menu), which is never visible to students but remains visible to instructors even with Edit Mode in the OFF position.
- Any course content items that you have hidden from students will disappear until edit mode is turned on again.
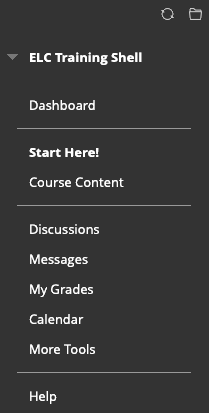
II. The Course Menu
- If you are using a "blank shell" rather than a pre-built course or a course template, you will need to create a Content Area from the + button in the course menu. This is where your course content will reside. Create only one Content Area per course.
- Caution: Never delete the Content Area link from the Course Menu; this deletes not just the link but all of the content within it, and there's no undo! You'll only get one warning. It is possible to delete your entire course in just two clicks!
- The course menu on the upper left side of the screen is the main course navigation tool. To customize the course menu, click on the + button and a menu appears. (Best practice is to use NAU's template and standard names for all course tools. Having a consistent interface across courses is helpful to students.)
- Tool Link lets you create a shortcut to any frequently used Blackboard tool, such as the Discussion Board, Messages, etc.
- In the Course Management Control Panel, you may need to adjust settings under Customization/Tool Availability if a tool is not currently available.
- Course Link lets you create a shortcut to a frequently used course content page or folder such as your syllabus, class schedule, readings folder, etc.
- Be sure to check the Available to Users box if you want this link to be visible to students. Otherwise it's visible only to you.
- When considering which items to put in the Course Menu, take a look at our sample Course Template for suggestions.
- If you don't have a Help link for students and a hidden Instructor Resources link for yourself in your course menu, try adding the following URLs using the Web Link option. Be sure to set them to open in a new window.
III. Building Course Content 

- In the Course Content area, which you can access from your course menu...
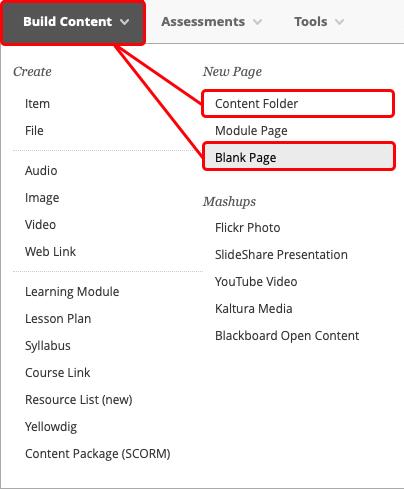
- Create course content folders using Build Content/Content Folder.
- Create course content pages using Build Content/Blank Page. Content pages created by the internal editor use the icon shown above.
- Hint: If you build a folder first, then go into the folder and choose Build Content/Blank Page, the page will be created within that folder. That saves you the step of having to move pages into folders after creating them.
- Setting the Course Entry Point: You can set the page where students arrive when they enter the course. Do this from the Course Management control panel under Customization/Teaching Style/Select Course Entry Point. You can change this any time, so a good practice is to set it to your Syllabus, Getting Started, or Course Schedule page early in the course, and then change it to the Course Content after everyone is in, and knows the rules.
IV. Using the Text Editor
Note: The Bb Learn text editor was upgraded on Nov. 5, 2020. The biggest difference is that the insert graphics/media functions are now under the + menu at bottom right of the toolbar. You can move/hover your pointer over any button and a popup "tool tip" will tell you its function.
- Bb Learn's built-in HTML editor allows you to create course content pages viewable in any web browser using familiar toolbar buttons.
- For practice, try each of the following:
- Type some text.
- Select it and change its format from Paragraph to Heading 1.
- Center the text.
- Change its font.
- Change the color of the text.
- Make some text bold or italic.
- Make a numbered and/or bulleted list with some sub-categories.
- Build a data table and put some information in it.
- Then add or delete a row or column.
- Create a hyperlink to an external website such as CNN.com.
- It is a best practice to set all links which point outside the course to open in a new window or a new tab so that the student doesn't accidentally lose their place in the course after viewing external content.
- Paste from Word: You can copy/paste text directly from Microsoft Word (or other sources) into a Bb Learn "blank page." Such content can be easily edited later in Blackboard. If the text contains formatting from Word that you want to remove, select/highlight the text and then use the
Tx Clear Formatting button. Creating native Blackboard pages is preferable to uploading Word documents because they can be edited directly, and because students don't need to download and locate the document to view it.
- Saving Changes: Nothing is saved until you click the Submit button at either the top or bottom of a page so get in the habit of submitting changes frequently to avoid losing work. Be careful not to navigate away from a page without first hitting Submit or you will lose your work.
- Also note that when you Submit (save), you get kicked out of the document and have to get back in to continue editing. Annoying, yes, but that's how it works.
- You can hide a page from students using the Options below the text editor window.
- Notice something that's missing? There's no simple way in Blackboard to link from one content page directly to another page somewhere else in the course. We've submitted that as a feature request, because it really should be possible. The best you can do is provide some text to the students that tells them how to get to that other page. For example, "When you're done with Module 3, go to the readings folder and read Article 4."
V. Adding Images
- Right-click on almost any web page graphic and your web browser can save a copy of the image to your computer.
- Be mindful about copyrighted images. Under the concept of "fair use," you can use copyrighted images for educational purposes, but it's polite to include a photo credit and a link to the source of your images.
- Add images (must be a .png, .jpg or .gif file) to your course content pages using the + button in the text editor toolbar and choose Insert Local Files.
- Images from a digital camera or smartphone should be scaled down to reduce the file size and help them load much faster.
- If you choose "Browse My Computer" you can select an image stored on your computer and Blackboard will put it in the top level of your Content Collection's public area (see Section VIII below for details).
- Even better, if you choose "Browse Content Collection" you can select an image that you previously uploaded into a neatly organized folder in Bb Learn's Content Collection. If you have lots of images, this is the better way to do it.
- Small images, like this one
 , can be added in line with text.
- Large images can be centered with blocks of text above and below or, if you want to get fancy, can be scaled, text-wrapped, bordered, and captioned by copying and pasting a few lines of code by accessing the <> HTML tool in the toolbar.
- Banner Graphics:
- To create a banner graphic, choose Build Content/Item. (The Item tool allows you to put some descriptive text directly under an image.)
- Next, click on the + button in the text editor's toolbar, choose Insert Local Files, and browse for the graphic you want to use.
- A banner should typically be about 800 pixels wide and about 150 pixels tall, and must be a .png, .jpg or .gif file type. To make it more mobile friendly, change a fixed width graphic to a percentage using the Bb Learn Better Graphics tips.

This is a fixed width (non-scaling) graphic that is 800 pixels wide and 150 pixels tall.
VI. Rearranging What Students See
 Drag and drop to re-order files and folders in the Course Content area and to rearrange the links in the Course Menu.
- Hint: Newly created files and folders will first appear at the bottom of the page. You may need to scroll down to see newly created pages and folders.
- When Edit Mode is ON, all files and folders in the Course Content area have an Action Link
 button to the right of their name. Click on that button to access a menu with the option to Move, Edit, or Delete that item.
VII. File Types


Folder, Blank Page, Item, Assignment, File, Lesson, Link, Test, Video, Audio
- A file's icon in Blackboard gives you useful information about the file's type. From left to right, the icons above are: Folder, Blank Page, Item, Assignment, File, Lesson, Link, Test, Video, Audio. While you can hide these icons, we don't recommend it, as it provides context to students about file types.
- Files created with Blackboard's internal HTML editor, such as Blank Pages and Items, will open directly in the user's web browser. This is the best approach to take.
- HTML files created outside the system use the generic icon and sometimes have permissions problems that can be difficult to fix, so we recommend avoiding that approach.
- Caution: Blackboard has recently added the ability to edit externally created HTML files stored in the Content Collection using the Edit in Blackboard option from the menu. This tool sometimes adds artifacts to the pages and does not fix any of the serious problems with externally created content, so we don't recommend its widespread use at this time. If you want to give it a try, we recommend working on a duplicate of the original document so that you can revert in case of problems.
- HTML files created by Microsoft Word are even more problematic because of Word's non-standard code. (However, a copy/paste of text direct from Word is ok.) You can also use the Tx Clear Formatting tool to clean up Word copy/pastes.
- Files such as PDFs and Word documents can also cause problems if students' computers aren't configured properly, but those issues can generally be resolved by the Student Technology Center.
- As a best practice, only use PDFs for documents you can't make into web pages or that you intend students to print, and only use Word docs if you intend students to modify them in Word or if you intend to mark them up using Word's Track Changes feature. Otherwise, convert to web pages using Build Content/Blank Page.
- Upload these external document types (PDFs, PowerPoints, Word Docs, etc.) using Build Content/File (but see the Content Collection section below for some helpful hints).
- Files of these types cannot be edited in Blackboard; they must be downloaded, modified and re-uploaded when you want to make changes to them.
- Students must have the appropriate helper application (such as Acrobat Reader or Microsoft Office) or browser plug-in (such as the now obsolete Flash, or Quicktime) installed on their computers to open these files.
- Be aware that any file that can't be opened by a browser plug-in must be downloaded for viewing.
- Be aware that some file types can't be opened on mobile devices. For example, Flash animations can't be opened on an iOS or Android phone or tablet.
- Where these files download and whether the computer opens them automatically varies depending on user settings. Many students have trouble finding files they downloaded, and will click repeatedly (causing multiple downloads) without success.
- If you use Word docs, PowerPoints, and PDFs in your course, tell the students the file type and make sure the filename has a proper 3 or 4 letter extension (.ppt, .docx, .pdf) so the computer has a better chance of figuring out how to handle it. Recommend the free OpenOffice or the Google apps for those who don't have Microsoft Office.
- For best results, set PDFs to open into a new window.
- It's a good idea to tell your students what kind of file it is when you want them to download something like a .pdf, .docx, .pptx, etc.
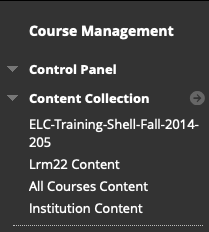
VIII. The Content Collection
- In the Course Management Control Panel under Content Collection, the first item listed is your course's public file storage area.
- The second item listed, with your NAU ID, is your private file storage area.
- The Content Collection is the place where all files that you brought in from outside Blackboard are stored. (Content pages created with Blackboard's internal editor are not visible here.)
- Take some time and organize your Content Collection. Organize this area into folders by course module or by file type to keep it from becoming a mess because, if you don't organize it, Blackboard will just put everything in one long scrolling list at the top level.
- Kinds of files that you should put in the content collection and organize in
 folders:
 PowerPoint presentations (.ppt, .pptx)
 Word documents (.doc, .docx)
 Excel spreadsheets (.xls, .xlsx)
 Portable Document Format files (.pdf)
 Images that you will use on one or more course pages (.gif, .jpg, .png)
 Media files (.mp3, .mov, .flv, etc.) We strongly recommend you put all video and audio files in Kaltura, using Build Content/Kaltura Media. Kaltura is a streaming media server that integrates with Blackboard and does a better job delivering these types of files.
 Externally created HTML files (though it's better to convert these to "blank pages")
 any other file types for students to download
- Naming Files: Be sure to give your files meaningful names so you can find them again later. Use a good naming system for your files. Avoid capital letters; use all lowercase. Use underscores_between_words. Avoid "funny characters" such as !@#$%^&* in filenames. Don't change or remove the three or four letter file extension such as .doc or .docx, .pdf, .jpg, or .gif
- Renaming Files: Is it ok if I rename a file in the content collection?
- Yes, if you are pointing to these files from pages created with the internal editor. Blackboard keeps track of files using an internal ID rather than by filename and location (as is the case for HTML docuements.)
- You can find the internal ID of a file in the content collection by clicking the file's action linkand selecting 360° View. The "Permanent URL" will look something like this, and will have "xid" in the name: https://bblearn.nau.edu/bbcswebdav/xid-16590724_1
- Be sure to empty old versions of files from the Recycle Bin to be sure you're pointing to the right one.
- It's not ok to to move or rename files in the content collection if you are pointing to them from HTML pages created externally by Word or DreamWeaver. Changing the name or location of the file will cause the link to break. Even if it works for now, it will break after the course is copied.
IX. Assignments (Submissions) and Assessments (Tests, Quizzes, Surveys)
Assignments: Student Submissions are called Assignments. Students can upload an Assignment by browsing for a file they created or by typing directly into the text editor box. To create an assignment, make sure the Editor is ON, and navigate to the location where you want the assignment to appear. Choose Assignments from the Assessments menu. Set the deadline, number of attempts and other Assignment parameters and click Submit. The assignment will not be visible to students outsite of the availability window you set. To the instructor, it will appear as a grayed out icon unless it is currently available. Is the submission is in written form, you may want to use Safe Assign to ensure that students are citing their work properly and to check for plagiarism. You might also consider creating a Rubric to help your students know what you're looking for, and to make your grading easier.
Assessments: Tests, Quizzes, and Surveys are called Assessments. The only difference is that survey results are anonymous. To create a new test, go to the Assessments menu and choose Test. Building a test has three steps:
- Create the Container for the test questions.
- Write the test questions one by one.
- Set the Availability parameters.
To get back to a test that you have already created, you can find it in the Course Content area, or go to the Course Management Control Panel, open Course Tools, and click on Tests, Surveys and Pools.
There are several places where you can modify test settings after the test has been created.
- To the right of the test's icon, with Edit Mode On, pull down the menu and choose Edit the Test.
- On this page you can edit test questions and set each question's point value manually.
- In the upper right of the Edit Test Questions screen, there is a button called Question Settings where, among other things, you can randomize answer order.
- To the right of the test icon, with Edit Mode On, pull down the menu and choose Edit the Test Options.
- Here you can set test availability, set feedback options, set number of attempts, randomize question order, and more.
- After the test has been taken by your students, with Edit Mode On, pull down the menu and select Item Analysis for diagnostics on test questions.
- Watch this video for information about question pools.
X. Accessible Design and Best Practices in Content Creation
There is no single best practice for all courses. As more and more work is done online, however, courses should shift away from the use of downloadable files (such as PDFs, Word and PowerPoint documents) and towards the use of content that is directly readable online, in the browser.
- Web-enhanced: Web pages are preferable, but PDFs are ok, and Word and PowerPoint files are acceptible, since the LMS is used mainly as a document repository.
- Blended/Hybrid: Web pages should be used more frequently, PDFs are acceptible for some uses, such as course readings, but use of Word and PowerPoint documents is discouraged.
- Fully Online: Web pages should be used almost exclusively, and PDFs are acceptible only when content cannot be made available as a web page. Word and Powerpoint documents should rarely be used.
Best Practices: All course content should be designed for universal access. Color can be used, but there should also be alternative navigational cues. Media (audio and video) should have a text transcript and videos should have close captions. All non-decorative course graphics should have ALT tags or LONGDESC descriptions. HTML Tables should have header rows to make them more readable by a screenreader. Scanners and photocopiers that don't use OCR (optical character recognition) will create inaccessible PDFs, where the text comes in only as an image. PDFs, which require a helper application (Acrobat Reader) in order to be viewed, may create an access barrier for some students and should, therefore, be converted to web pages where practical. Students should be made aware of free alternatives to Microsoft Office. Content that has been converted to web pages is easiest to keep up-to-date, and least likely to cause access barriers.
Tools: Ask about the new ALLY tool available Spring '19. Remember that universal design is essential to people with disabilities, but it's helpful to everyone. Install the WAVE browser extension to check your web pages for accessibility. It's available for Chrome and Firefox.
Exceptions: Documents that contain forms to be filled in and submitted, such as Word documents, or documents that need to be in a special format in order to function properly, such as an Excel spreadsheet should be kept in their native format. PDF documents with complex formatting such as a newsletter with multiple text columns and numerous embedded graphics, or that are destined to be printed, should be kept in their native file format, but efforts should be made to ensure that they are accessible.
If you have questions about how to make your course more accessible, contact e-Learning and/or Disability Resources for assistance.